...
Create a new job by clicking on “Create Job” in the left panel. This will send you to the Create New Job screen.


Enter the following information into the report details page. All fields are required unless otherwise noted:
...
- Report Type: At least one report selection is required. You may also select multiple report types. See below for information on each Report Type.
- Polygon Format: Polygons are bounding boxes drawn around a location on a map such as a retail store. Each Data API job requires a valid GeoJSON or KML string. The Data API can also accept ESRI Shapefiles. For details on how to load ESRI Shapefiles, see below. After selecting the correct format, paste the GeoJSON or KML string in the text box.
- ESRI Shapefiles: Due to the detailed nature of ESRI Shapefiles, please be sure your Shapefiles are properly formatted.
- Format: Usually, an ESRI Shapefile will contain three or more files (.shp, .dbf, and .shx plus others such as .prj). These associated files must be zipped together into one file for use here (the files must be in the root of the zip file). Do not place these files into a folder and then zip the folder. Please note that there should be no spaces in any of the file names.
- ESRI Reference Field Name: This is the reference field in the ESRI Shapefile which refers to the polygon name information. Often this is just "name", but it is possible that there is another term for this field. This is set by the Shapefile creator, and cannot be predicted, so it must be included in the request. It can be found in the ESRI Shapefile metadata, as a string field.
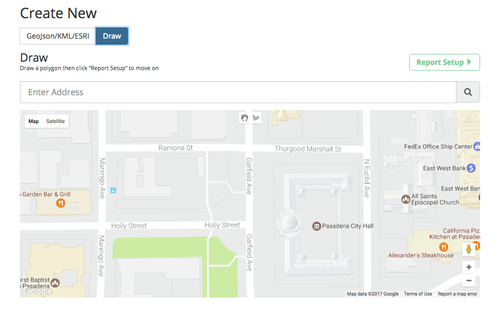
- Draw a Polygon: Select the "Draw" tab to draw a polygon for use in the API.
- Use the search field to find the correct location, and select the "Draw a Shape". Click to place each point on the polygon; click the original point to close the polygon.
- ESRI Shapefiles: Due to the detailed nature of ESRI Shapefiles, please be sure your Shapefiles are properly formatted.
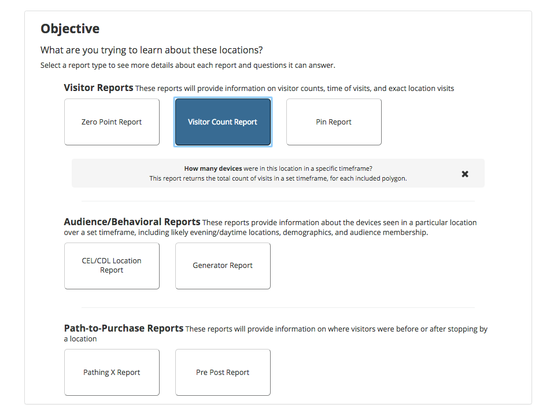
- Objective: What are you trying to learn? There are three report types, with multiple options for each. At least one report selection is required, and you may select one report from each report type section. See below for information on each Report Type.
- Select a report to see questions this report can answer, as well as understand more about the data that will be provided.
- Timeframe: Set the period for when the analysis should occur.
- Start Date and Time: The start date and time refers to the period for when the analysis should start. This must be at least greater than 48 hours prior to the the current day/time. Note that this uses UTC time zone.
- End Date and Time: The end date and time refers to the period for when the analysis should end. This must be at least 48 hours prior to the current day/time. This time is not inclusive- if a job is submitted with an end time of 23:59:59, that is the cutoff time (it does not include any milliseconds beyond 23:59:59). If the full final second of that day is needed, the end date and time should be 00:00:00 of the next day. Note that this uses UTC time zone.
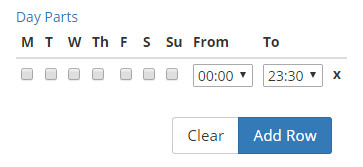
- Day Parts: Click on the Day Parts link to open up additional day parting selections. See below for an explanation about how to use Day Parts in your analysis.
- Seconds Before: An integer value that specifies the number of seconds before your selected date and time. This is required for Path-to-Purchase reports.
- Seconds After:An integer value that specifies the number of seconds before your selected date and time. This is required for Path-to-Purchase reports.
- Report Details: Other details and parameters that can or should be included for a job.
- Name: The name of the report. Use terms that make this report easily searchable by your team.
- Additional Emails: Add any additional email addresses to receive reports, comma separated.
- Include Full Geographic Info: Turning this field on will provide additional information including Country, State, Postal Code, and Census Block Group.
- Split File: Large files can be difficult to open in Excel. Setting this to true will split files that are over 1,000,000 lines. This only applies to tsv/csv files.
When the form is complete, select “Run Report” to submit the job. You will be redirected to the Job Status page and emailed with results when the report(s) are ready.
...
When entering the Start and End Dates for your report(s), you can optionally choose to select Day Parts for the analysis. This enables you to see an analysis based on certain days and times of the week for the device in the local time zone. For example a device seen in PT at 1pm would be analyzed against a device seen at in ET at 1pm.
Recreate Job
If you would like to recreate a previously run job, hover over the job in the Job Queue to reveal a tab on the left with the Recreate Job button. Selecting this button will open up the Create Job screen, with all previously used parameters already selected. All fields can be edited before the job is submitted.

Please note: All KML and ESRI shapefiles are converted to GeoJson for analysis in the Data API. When recreating a job, the locations will appear as a GeoJson, but will remain the same.
Report Types
UberMedia provides a variety of reports that analyze devices seen within selected polygons.
...