The Data API allows you to run a variety of reports based on the UberAds geo-summary logs. To access, select "Data API" from the top navigation.

Job Status
View existing Data API jobs and their status on the Job Status screen. Select "Job Queue" from the left panel to access. If there are no jobs listed in this table, click “Create Job” on the left panel to get started.
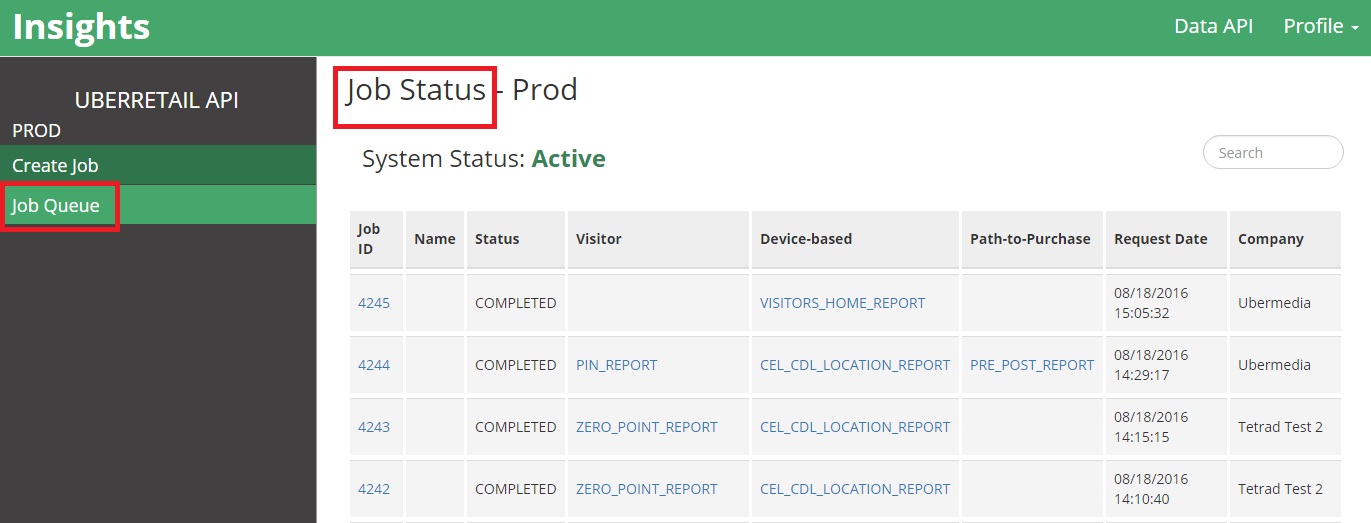
In the Job Status list, you'll find the following information for each of your Data API requests:
- Job ID: Job ID is a numerical designation to keep track of your requested Data API jobs. Click this number to see details about the requested job.
- Name: The name of the job if it was given one.
- Status: There are four possible statuses for a submitted job:
- Submitted: The job has been submitted but has not yet begun processing.
- In Progress: The job is processing. You will be alerted via email when the job is complete.
- Completed: The job is complete and the report(s) will be sent to you via email, or you can access via download in the UI. When the job is complete, the report will be visible under the various report type columns: Visitor, Device-based, or Path-to-Purchase (Read more about the different Report Types here). You may download the report by clicking on the name for each report type.
- Failed: The job has failed. If you see this status, please contact your UberMedia account manager in order to assess the problem.
- Request Date: The date the job was requested.
- Company: The specific company the job is related to.
Create a New Job
Create a new job by clicking on “Create Job” in the left panel. This will send you to the Create New Job screen.
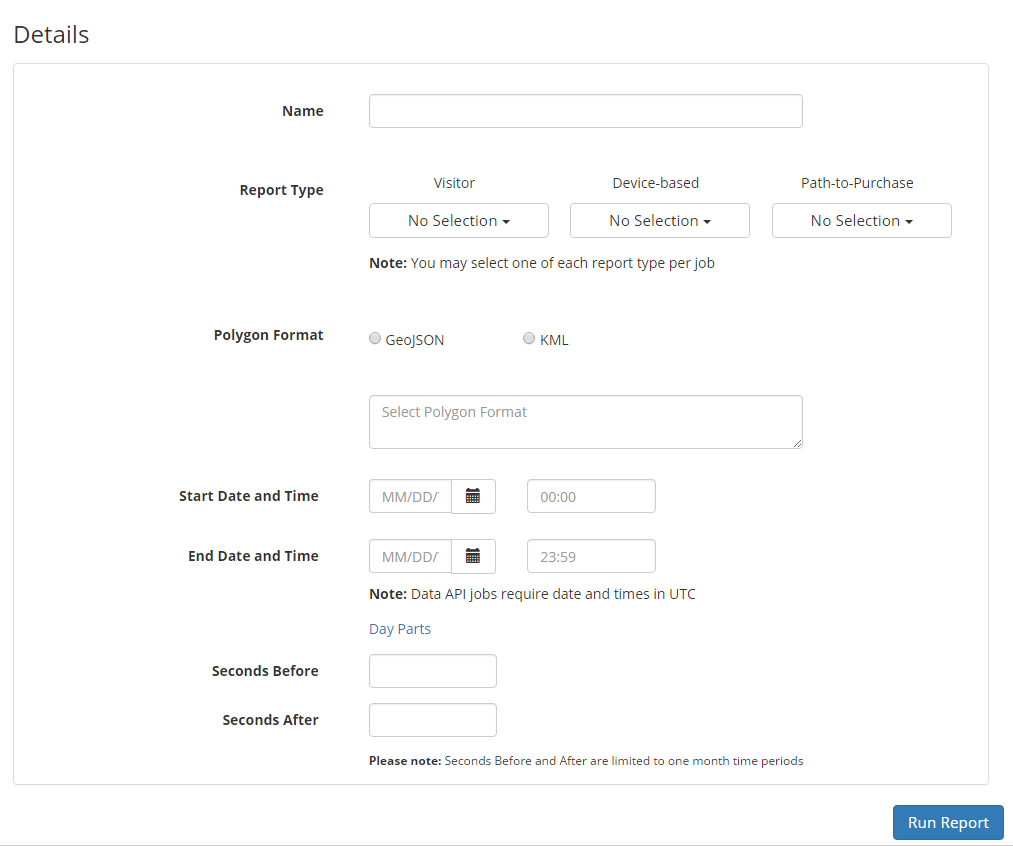
Enter the following information into the report details page. All fields are required unless otherwise noted.:
- Name: The name of the report. Use terms that make this report easily searchable by your team.
- Report Type: At least one report selection is required. You may also select multiple report types. See below for information on each Report Type.
- Polygon Format: Polygons are bounding boxes drawn around a location on a map such as a retail store. Each Data API job requires a valid GeoJSON or KML string. After selecting the correct format, paste the GeoJSON or KML string in the text box.
- Start Date and Time: The start date and time refers to the period for when the analysis should start. This must be at least greater than 48 hours prior to the the current day/time. Note that this uses UTC time zone.
- End Date and Time: The end date and time refers to the period for when the analysis should end. This must be at least 48 hours prior to the current day/time. This can be the current day/time. Note that this uses UTC time zone.
- Day Parts: Click on the Day Parts link to open up additional day parting selections. See below for an explanation about how to use Day Parts in your analysis.
- Seconds Before: An integer value that specifies the number of seconds before your selected date and time. This is required for Path-to-Purchase reports.
- Seconds After: An integer value that specifies the number of seconds before your selected date and time. This is required for Path-to-Purchase reports.
When the form is complete, select “Run Report” to submit the job. You will be redirected to the Job Status page and emailed with results when the report(s) are ready.
Day Parts
When entering the Start and End Dates for your report(s), you can optionally choose to select Day Parts for the analysis. This enables you to see an analysis based on certain days and times of the week for the device in the local time zone. For example a device seen in PT at 1pm would be analyzed against a device seen at in ET at 1pm.

Report Types
UberMedia provides a variety of reports that analyze devices seen within selected polygons.
- Visitor Reports: Reports the number of devices seen in a polygon for a given time.
- Zero Point Report: Provides information on devices seen in a polygon during the requested time period and the time stamps for each device's visit.
- Visitor Count Report: Provides a total count of visitors in a polygon for the requested time period.
- Device-based Reports:
- CEL/CDL Location Report: Provides the likely location that devices, observed in a polygon, spend the majority of their time. This could be in a residence or, for overnight workers, a business. These high confidence locations are called CEL (Common Evening Locations)/CDL (Common Daytime Locations) and are NOT available for all visitors. Thus, the amount of device IDs listed is likely to be smaller than in a visit count report. The existence of a common daytime location does not imply that a common nighttime location is available and vice-versa. The determination of CEL/CDL uses multiple observation points across months of time, IP screening and other proprietary methodology.
- Generator Report: Provides the likely origin point for a visitor (evening or daytime location), using a different methodology than CEL/CDL. This is done by evaluating the past 7 days of observation points for a device and has a lower confidence than CEL/CDL, but generally has a larger overlap with visitor counts.
- Path-to-purchase Reports:
- Pathing X Report: Provides information on where a device was seen prior to being inside a polygon. Note that “Time before appearance” is in seconds. Actual visits will be present in this report, but have a “Time before appearance” value of 0.
- Pre-Post Report: Provides all the points a device was seen in the time before an appearance in the polygon AND the time after the appearance in the polygon.